Update on the fairy garden

I have finally been able to get out in the garden this week after, two weeks of having rain nearly every day and some days all day long and the fairy garden has become quite untidy.

fairy garden mess

However after only half an hour of weeding, pruning and tidying it is looking very good!

fairy garden weeded

All of the plants have taken well (I guess the rain has helped!) and all have grown and spread, I am really pleased with how the thyme lawn is filling out the space.

lawn areaย  thyme lawn

The patio area is looking good too, with the plants filling out the space and very little soil now showing.

patio areaย  around fairy patio

It really has been easy to maintain so far, the soil seems to suit the plants well, as does the planting position under the tree. It has been a relatively cheap, easy but rewarding project!

Thanks for visiting

Jackie ๐Ÿ™‚

Making a broken pot fairy garden (part 3)

No blog last week as the weather was awful and I did not get outside, but a major improvement and lots of lovely sunshine this week!

So time to have a go filling up the broken pot, firstย  I put a piece of pot over the drainage hole and then added some compost, I tried fitting in the large broken piece from the side but could not get it to stay. So finally broke off (with large hammer) some of the excess pot from under the two rim pieces so that I could layer them up and these stayed in place better. Once in place I started adding the steps with the pieces I made last time, the steps ran into the edge of the rim pieces so I removed them and with the hammer tapped away at the edge to make a gap so the fairies had somewhere to go at the top of the steps!

I then filled it with more soil and buried a piece of pot to stop the soil from falling back out, then added a piece of the first broken pot to make a further layer for planting

I then used pieces of alpine plants that I had split from others around the garden to plant up the fairy garden.

broken pot plants

Finally I added some fine gravel, some homemade stepping stones and a homemade bench to make the garden complete!

broken pot complete

Unfortunately it doesn’t look anything like I had imagined and nothing like the lovely ones I have seen on the net but I guess it’s ok for a first attempt and especially as the more of the pot than I wanted came away. It wasย  definitely more tricky than I thought, so good luck if you’re going to have a go!

Jackie ๐Ÿ™‚


Making a broken pot fairy garden (part 1)

I have been aware of the broken pot fairy gardens for some time now and loved the way they looked (I had thought about making one to take to craft fairs but realised it would be much too heavy to transport) so I have finally got around to having a go.

I thought I was off to a good start because I had an old terracotta planter down the garden with a large crack in it, so today I emptied it ready to make a start.

pot with crack

I had a quick look on the web at how to crack the pot where you want it to crack and decided as it already had a large crack if I took a sharp chisel and tapped along the line I wanted it to crack it would be ok…………….it wasn’t……..

broken  in bits.jpg

I may be able to use some of the pieces but this was definitely not what I had planned!!

I have another pot (a brand new one) but before I make a start on this one I am going to do A LOT more research on how to get the pot to crack where you want it to!!

So today instead I decided to gather and make pieces for the steps to add to the pot, I keep my old broken pieces of pot to use as drainage in other planters so started tapping pieces with a hammer to try and get small rectangular pieces, these are the pieces I have so far.

steps for planter.jpg

I was hoping for all the pieces to be a similar size, but that didn’t go to plan either and I have a lot more pieces that I can’t use than pieces that I can, I think this project is going to involve quite a lot of waste product!!!

Right I am off to do some research, thanks for looking!

Jackie ๐Ÿ™‚

The completed fairy garden

complete garden

So here it is the completed fairy garden along with accessories! In the lawn area we have a copper bird bath, a garden swing along with a copper bird house, toadstools a hedgehog and a rabbit. There is a lovely stone bridge for the fairies to cross the river.ย  As you can see I have removed the Forget-Me-Nots they were getting much too tall to fit with the garden, but the thyme lawn is starting to spread and the conifer and alpine hedge have taken well.

In the patio area we have a wire bench seat along with a bistro set and a large planter planted up with more slow growing alpines and another rabbit down by the pond. All the plants in this area are showing signs of new growth with some even coming into flower.

I am really pleased with the whole garden and am looking forward to adding more accessories. I really think the tree needs some windows which I have been working on this week, so I should hopefully be able to add these soon, I will post an update when they are added and show how the plants are coming along.

Next I think I am going to try and make a broken pot garden as I really like the look of these, so please come back and see how I get along!

Jackie ๐Ÿ™‚


Making a fairy garden around a tree, stage 6

I mentioned last week that I thought I needed to fill some gaps in the garden and at a local home and garden shop I found some half price alpines, I looked for ones that looked like they could be split and bought Antennaria rubra, height 4 inches and Mazus reptans height 2 inches. The Mazus I split to use as more hedging along the fence.

new alpine hedge

The Antennaria was split and used to fill gaps around the patio and in the flower bed.

other alpine split

So far everything seems to have taken well to its new home and is growing well even with the awful weather we have been having and in fact as predicted the Forget-Me-Nots are growing too fast and I think they will have to be removed very soon!

large forget me not

Next week we will add some accessories and see whether any more plants need adding. At least this week we have been forecast some better weather!

Thanks for visiting

Jackie ๐Ÿ™‚


Fairy Garden Construction Stage 5

As I said last week the next step would be the path and the stream so here is how I did them. First I bought a bag of white pebbles in the wedding section of a local bargain shop and some white and multi aquarium gravel from a local garden centre. I put the pebbles as a boundary along the edges where I wanted the path to run, then scooped out a shallow trench within this area and filled it with the aquarium gravel, simple but quite effective.

path.jpg

Then I did the same for the stream, the edges were made with granite gravel that we have on our driveway (but could have been done with polished pebbles which can be bought in small bags in may shops). The stream was filled with a mix of blue aquarium gravel (from the same garden centre) and crushed glass which was bought in the candle section of Ikea. I was really pleased with how this turned out!

stream

So there we have it a footpath from the door down to the stream and a stream leading to a pond! Next is to find a few more plants to fill the gaps and start adding the accessories to make the garden complete!

stream and path

I just wish the weather would warm up so that I can spend some time outside to enjoy my efforts!! (Wintry showers yesterday and possible thunder storms today, with a high of only 8 degrees and another overnight frost!! ๐Ÿ˜ฆ )

Thanks for visiting!

Jackie ๐Ÿ™‚

Making a fairy garden, stage 4

Right, planting time!! The first area I planted up was the lawn and the edge of the stream area. Only a few of the alpines were able to be split and unfortunately the one I used for the hedge did not have a label and I can’t remember what it is!!! But here is a picture of it!

hedge plant

This was separated into smaller pieces and used as a hedge along the fence at the side of where the river will be. Next I planted the prostrate thyme as the lawn, and as it could not be split I also added the moss, but I think I will go and buy another couple of the thymes to help the lawn fill out faster.

lawn area

Next I added the conifer to give some height and interest at the back of the lawn and as you can see from the picture I planted forget-me-nots which I split from other areas around my garden to edge the lawn until the thyme grows. These will have to be removed at a later date as I believe they grow and spread much too fast to be part of a fairy garden.

I then planted the area around the log patio, I wanted this to represent a herbaceous flower bed. Once again I planted the conifer at the back for interest and height and added the box privet, which I trimmed to make it shorter and rounder. I then put in all of the alpines and thymes that I had left. I was able to split the leptinella and the sedum and so was able to spread these around the edge of the patio as well as in the flower bed. There are still a few gaps so I will keep my eye out for some more plants to fill these.

patio area

Now it’s a case of keep watering and checking to see if they are happy in the compost mix and their home under the tree!!

Next week adding the path and the stream!

Bye for now

Jackie ๐Ÿ™‚

Constructing a fairy garden, stage 3

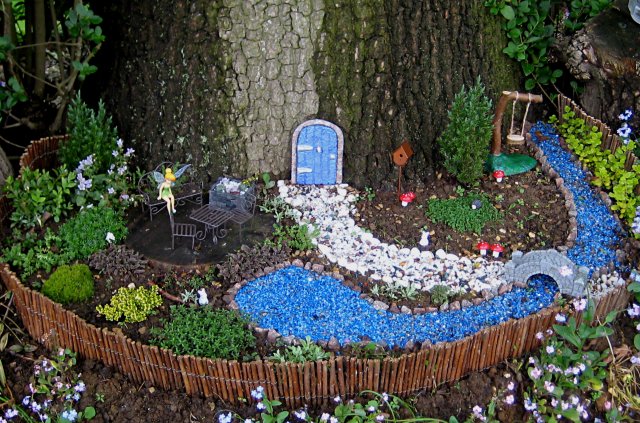
After a discussion with Mr Sunshine, who seems to think I am very messy (he may be right!) it was decided to add the planting before the garden features as he thinks I may get soil everywhere!

However, when Mr Sunshine had the chain saw out at the weekend I had an idea for the fairy patio and asked him to cut me a slice from a chunk of oak tree branch, which we have around the garden since having the tree pruned a few years ago. It only took him a few minutes and was very easy to put into the garden and also easy to wipe clean after adding the plants!

I had been planning on adding a large chunk of slate that I had seen at the garden centre, or a small pavier that we have going spare or to make something myself with concrete and pebbles, but I am very pleased with the oak slice!

Next was the good bit, choosing and buying the plants, so here is what I got!

First for some height in the garden two miniature conifers for fairy trees and a hebe and a box privet for fairy garden bushes.


To add some fragrance to the garden and hopefully to use as a lawn, 3 different species of thyme

thyme

As a flowering bush I bought a white campanula, which has nice dainty flowers.

campanula

Finally I bought 5 different alpines, some for their texture and foliage and others to use as part of the flower bed or as a flowering hedge (if I can split them!)

I also found, growing in a plant pot on my patio, some moss and so plan to add this to the garden too as part of the lawn.

.moss

I may need some more but these will do for now, I can’t wait to get planting!

Thanks for having a look at progress!

Jackie ๐Ÿ™‚

Fairy garden construction stage 2

Luckily we had some dry weather at the weekend and I was able to continue with the fairy garden. The first thing to do was to raise the soil levels both inside and outside the edging, which I did with more of the compost and sand mixture and I also added some gravel (after watching Monty Don making some free draining compost).

I subdivided established plants from around the garden to use to fill the soil around the outside of the fencing, hopefully they will help to stabilise the soil and keep it in position as well as look attractive. The plants I used were grape hyacinth, lesser celandine, vinca minor and forget me not.

fairy garden stage 2


Finally I used sand to mark out the landscaping features that I would like to add to the garden. First I am going to have a stream that runs into a pond, then a garden path leading to a bridge over the stream and finally a patio area near the door and adjoining the path. These will be the next areas to work on before adding the planting.

Thanks for stopping by and checking on progress!

Jackie ๐Ÿ™‚